

The soil beneath our feet is far more than just dirt – it's a living, breathing ecosystem teeming with billions of microorganisms that play crucial roles in plant health, nutrient cycling, and sustainable agriculture. Understanding this invisible world is key to developing farming practices that work with nature rather than against it.
Soil is the foundation of all agricultural productivity, yet its true potential can only be understood through careful analysis. Soil sampling is a critical step in assessing soil health, fertility, and nutrient status, guiding farmers and researchers toward informed management decisions. This article explores the essential methods of soil sampling, highlighting best practices and techniques that ensure accurate, reliable results for sustainable and productive farming systems.
Introduction to Soil and Soil Sampling
Soil is the foundation of agriculture. Understanding its physical and chemical properties is essential for sustainable crop production, efficient fertilizer use, and long-term soil health management. Soil sampling is the first and most critical step in soil testing, as the accuracy of laboratory results depends largely on how well the sample represents the field.
Why Soil Sampling Is Important?
Soil sampling provides reliable information about nutrient status, soil reaction (pH), organic matter, and potential constraints affecting crop growth. Without proper sampling, fertilizer recommendations may be inaccurate, leading to yield loss, increased costs, and environmental pollution.
- To assess soil fertility and nutrient availability
- To develop crop- and site-specific fertilizer recommendations
- To monitor soil health over time
- To detect nutrient deficiencies, toxicities, or salinity problems
- To support sustainable and climate-smart agriculture
Did You Know?
“Healthy soil leads to healthy crops, and healthy crops begin with proper soil sampling.”
Benefits of Proper Soil Sampling
Efficient fertilizer use
Avoids over or under-application of chemical and organic fertilizers.
Environmental protection
Minimizes nutrient losses and pollution into the fied and seepage/leaching to the nearby water sources.
Cost savings
Reduces unnecessary input costs through optimal use of inputs.
Improved crop yield and quality
Improves the crop yield due to optimal use effciency of inputs.
Better decision-making
Operations and activities are guided by the evidence i.e. data.
Better soil health
Soil health is monitored through testing and can be maintained for sustainable production.
Soil Sampling Methodology
The following methodology ensures that soil samples accurately represent the field conditions. The process includes field planning, sample collection, composite preparation, and proper handling for laboratory analysis.
Main Tasks in Soil Sampling
- Field layout or sampling plot division
- Collection of sub-samples
- Preparation of composite samples
- Packing and labeling for laboratory analysis
"Invest time in soil sampling; it pays back through better yields and healthier soils"
1. Field Layout and Plot Division
The entire field should be divided into distinct sampling plots of 1–2 ropani each. Plot division must be based on:
- Similar topography
- Similar soil color and texture
- Uniform cropping history
- Comparable management practices
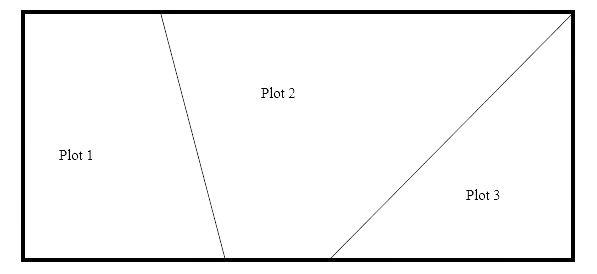
Plot size may vary depending on land features and variability.
2. Collection of Sub-Samples
Before sampling, slightly clean the soil surface, but do not remove the topsoil.
Sampling Depth:
- Vegetables and cereal crops: 25–30 cm
- Fruit crops (based on purpose):0–30cm, 30–60cm and 60–90cm
- Spade or Khurpi
- Soil Auger
- Make a V-shaped notch up to 30 cm deep
- Take an equal-thickness slice of soil from one side of the V
- W-shape
- Z-shape
- M or N pattern
- Diagonal or zig-zag Random
- Along the transect
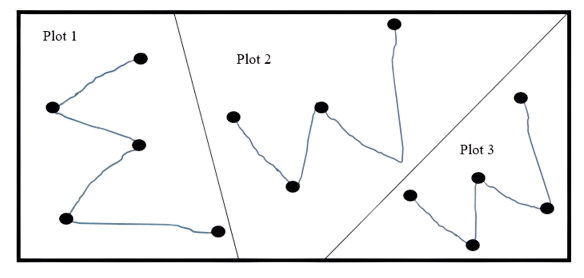
Each point represents one sub-sample.
3. Preparation of Composite Sample
- Collect 7–8 sub-samples from each plot
- Mix all sub-samples thoroughly in a clean container
- Treat each plot separately
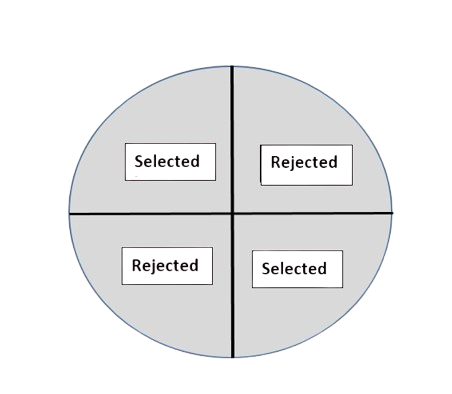
Quartering Method: After mixing:
- Divide the soil into four equal parts
- Discard two opposite parts
- Mix the remaining two parts
- Repeat until the sample weight is reduced to 0.5 kg
This ensures a representative composite sample.
4. Packing and Labeling for Laboratory Analysis
Each soil sample must be properly labeled with the following information:
- Name of the sender
- Address and contact number
- Date of sampling
- Place of sampling
- Cropping pattern
- Purpose of sampling
- Any disease, pest, or abnormal crop symptoms
For fruit crops, samples must also be labeled according to depth.
Important Tips: Dos and Don’ts
Do’s
- Collect samples after harvest and before sowing the next crop
- Use clean tools and containers
- Sample each plot separately
Don’ts
- Do not sample near irrigation channels or water sources
- Avoid areas where manure or fertilizers are heavily deposited
- Do not sample soil immediately after heavy rainfall (wait 2–3 days)
- Avoid field edges, bunds, and ridges
“Good sampling today prevents wrong recommendations tomorrow.”
Conclusion
Soil sampling is not just a routine activity, it is a scientific foundation for soil testing and sustainable nutrient management. Proper sampling techniques ensure accurate laboratory results, reliable fertilizer recommendations, and improved crop productivity while protecting soil and the environment. By following standardized soil sampling procedures and best practices, farmers and agricultural professionals can make informed decisions that support soil health, farm profitability, and long-term sustainability.